Virtual Disk Images Help
Welcome to the Virtual Disk Images Help Page! The old FAQ page is still accessible as a sub-page of the Help Page, if that's what you're looking for.
Help Topics:
Help Topics:
Changing the bios date in vmware and virtual pc 2007
VMWare:
Method 1: Direct Enter into BIOS
1. Start your virtual machine.
2. Repeatedly click inside the virtual machine window and press F2 repeatedly. The POST screen should appear for just a second, and then you will be taken into the BIOS setup.
3. Change the BIOS date.
Method 2: Forcing the BIOS to show if the POST screen clears too quickly
1. Create your virtual machine, and then open its .vmx file. This is usually located in Documents > Virtual Machines > [YourVMname] > [YourVMname].vmx.
2. Right click on the VMX file, and click "Open With." Browse to Notepad and click OK.
3. Insert this line of code at the top of your VMX configuration file: bios.forceSetupOnce = "TRUE"
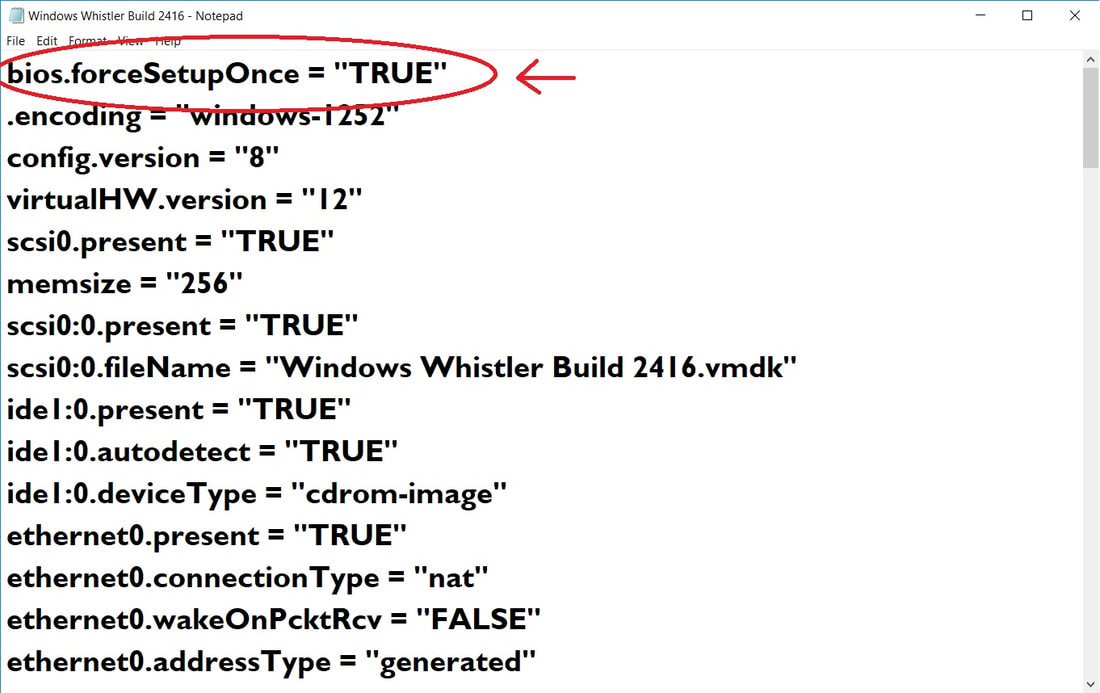
It should look something like this.
4. Now, just save the file by going up to File > Save. Now, the BIOS setup screen will automatically display the next time you boot up your virtual machine, but only once.
5. Change the BIOS date.
Method 3: Giving the POST screen more time before booting
1. Repeat steps 1 and 2 from Method 2.
2. Insert this line of code at the top of your VMX configuration file: bios.bootDelay = "5000"
where "5000" is the amount of time to wait, in milliseconds. You can add more time if you need to.
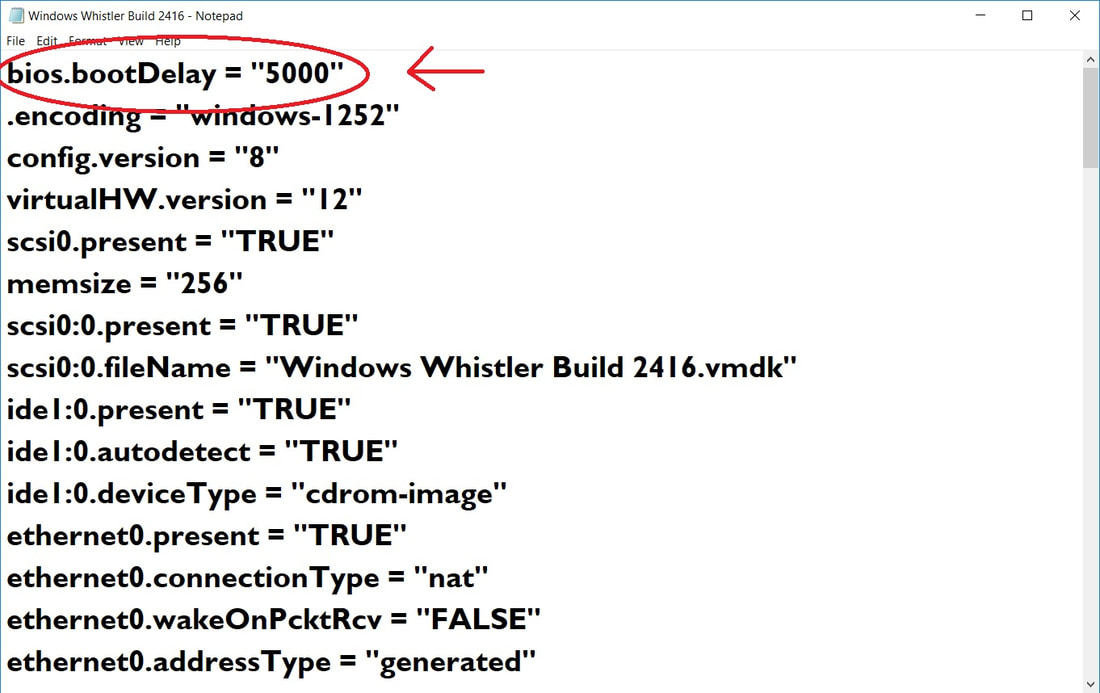
It should look something like this.
3. Now, just save the file by going up to File > Save. Now, the POST screen will wait the specified number of seconds before booting into the OS, giving you time to enter the BIOS setup. (press F2 to do so.)
4. Change the BIOS date.
Virtual PC 2007:
1. As soon as you start the virtual machine, click inside the virtual machine window and repeatedly press the "Delete" key. This will take you into the BIOS setup.
2. If you are just wanting to get into the BIOS, you don't need to do anything else. But if you want to change the BIOS date and have the changes stay after a reboot, there is a fix that you need to make to your virtual machine's setup file.
3. Locate your virtual machine's setup file, which should be located in My Documents > My Virtual Machines > [YourVMname] > [YourVMname].vmc.
4. Right click on the VMC file, and choose "Open With." Browse to Notepad and then click OK.
5. Copy and paste this line of code EXACTLY as it appears after the </video> tag and inbetween the <microsoft> tags:
| virtual_pc_2007_bios_date_fix.txt |
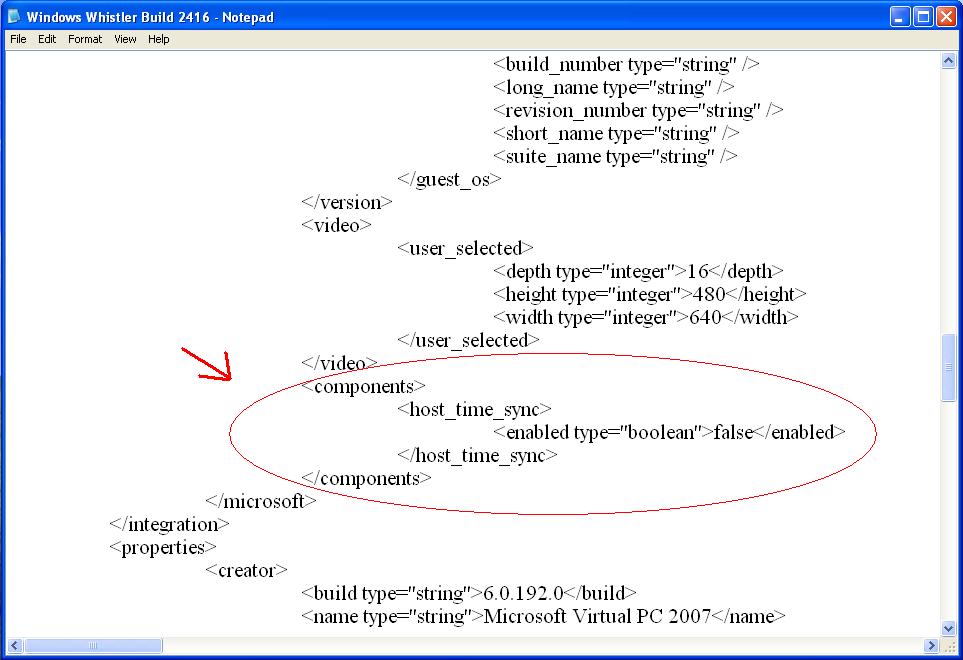
It should look something like this.
6. Now, just save the file by going up to File > Save. This will disable the guest OS's timesync, which will allow you to change the BIOS date and have it stay.
7. Enter the BIOS (see step 1) and change the BIOS date.
6. Now, just save the file by going up to File > Save. This will disable the guest OS's timesync, which will allow you to change the BIOS date and have it stay.
7. Enter the BIOS (see step 1) and change the BIOS date.
qemu manager and windows 10
*This topic only applies to Windows 10 users.*
While QEMU Manager does work with Windows 10, you will need to change some settings in order for it to display and run correctly.
1. Right click on your shortcut to QEMU Manager, and click Properties.
2. Under the "Compatibility" tab, make sure to check "Run this program in compatibility mode for" and in the drop-down menu select Windows XP (Service Pack 3.) Check "Override high DPI scaling behavior" and make sure that scaling is performed by the application (in this case, QEMU Manager.)
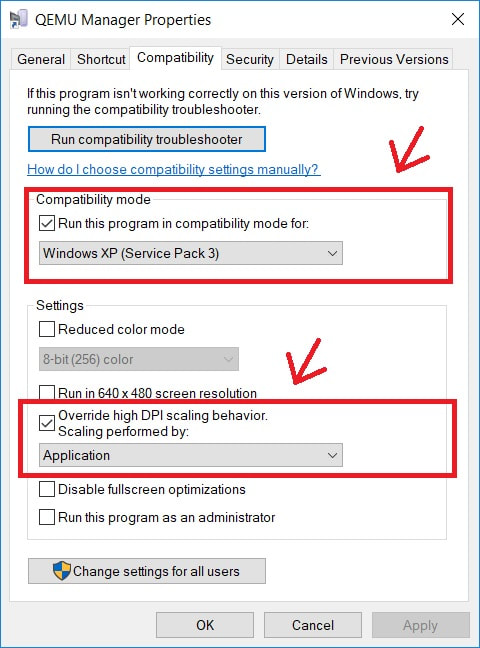
It should look something like this.
3. Now, just save the settings by clicking "Apply" and then OK. QEMU Manager should now run fine.
3. Now, just save the settings by clicking "Apply" and then OK. QEMU Manager should now run fine.
Boom! No more issues.
disabling the timebomb in windows betas
For those of you who don't know what exactly a "timebomb" is, it's a piece of code written into a computer program (in this case an operating system) that will cause it to stop working after a certain date or time. Timebombs are especially prevalent in beta or prerelease builds of operating systems.
Known OS's with timebombs:
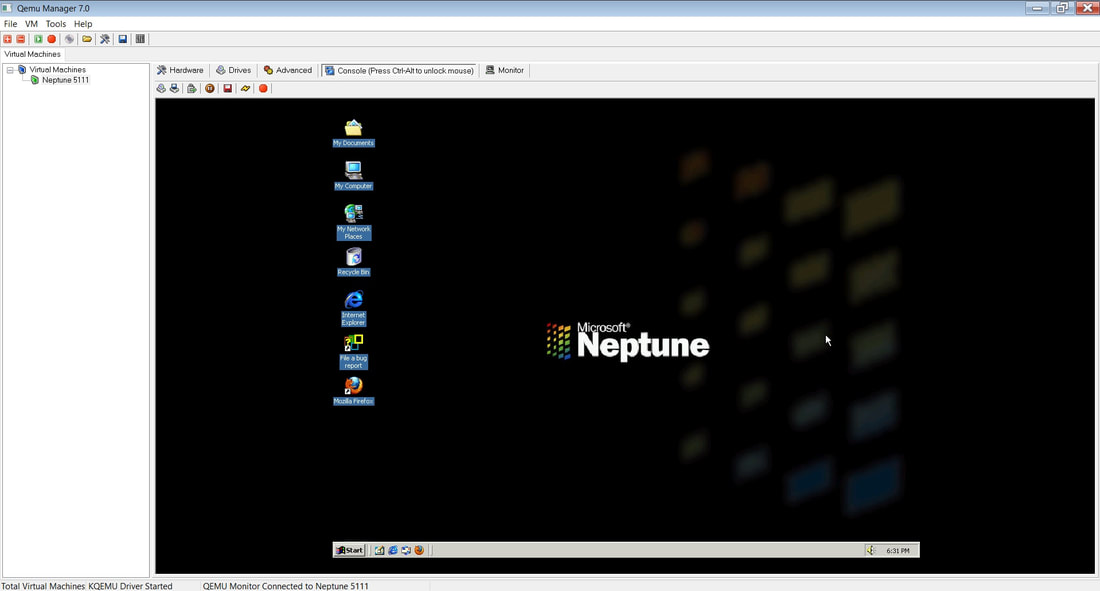
-*Windows NT 5.0 Beta 2
-*Microsoft Neptune Build 5111
-Windows Longhorn Build 4029
-Windows Millennium Build 2332
-Windows Whistler Build 2416
-SD Windows 2000 Professional (Build 2202)
*Timebomb pre-disabled.
As you can see, for Windows NT 5.0 Beta 2 and Microsoft Neptune Build 5111, the timebombs are already disabled and you don't have to do anything. However, for the rest of these operating systems, a fix is required to disable the timebombs. At this time, the only known fix is for Windows Longhorn Build 4029, and here's how to fix it.
Windows Longhorn Build 4029
*Before starting, please note that this procedure is not required to run Longhorn, but is necessary if you want to browse the Internet or download anything from it within the VM. Also, if you don't want to worry about having to change the BIOS date every now and then, then I recommend doing this procedure. However, it is NOT a requirement.*
1. First of all, you will need to download two things.
-My Windows Longhorn 4029 CD, which contains all of the necessary tools and fixes. (NOTE: Your antivirus software may not allow you to install this ISO, or may label it as a virus. Don't worry, this is a false-positive.)
-The zorin-os-2-live-32 CD, which is a live Linux distro. You'll see why later.
2. Before booting up Windows Longhorn, be sure to change the BIOS date to 6/20/2003! If you do not change the BIOS date before applying the fix, then the OS will not start.
3. Make sure that you have mounted the TweakNT ISO into your virtual machine's CD drive, and start Longhorn.
4. Once booted, click on the Start menu and click on My Computer. Browse to the CD-ROM drive and open the "Longhorn4029Fix" folder, and copy winlogon.exe to the desktop.
Known OS's with timebombs:
-*Windows NT 5.0 Beta 2
-*Microsoft Neptune Build 5111
-Windows Longhorn Build 4029
-Windows Millennium Build 2332
-Windows Whistler Build 2416
-SD Windows 2000 Professional (Build 2202)
*Timebomb pre-disabled.
As you can see, for Windows NT 5.0 Beta 2 and Microsoft Neptune Build 5111, the timebombs are already disabled and you don't have to do anything. However, for the rest of these operating systems, a fix is required to disable the timebombs. At this time, the only known fix is for Windows Longhorn Build 4029, and here's how to fix it.
Windows Longhorn Build 4029
*Before starting, please note that this procedure is not required to run Longhorn, but is necessary if you want to browse the Internet or download anything from it within the VM. Also, if you don't want to worry about having to change the BIOS date every now and then, then I recommend doing this procedure. However, it is NOT a requirement.*
1. First of all, you will need to download two things.
-My Windows Longhorn 4029 CD, which contains all of the necessary tools and fixes. (NOTE: Your antivirus software may not allow you to install this ISO, or may label it as a virus. Don't worry, this is a false-positive.)
-The zorin-os-2-live-32 CD, which is a live Linux distro. You'll see why later.
2. Before booting up Windows Longhorn, be sure to change the BIOS date to 6/20/2003! If you do not change the BIOS date before applying the fix, then the OS will not start.
3. Make sure that you have mounted the TweakNT ISO into your virtual machine's CD drive, and start Longhorn.
4. Once booted, click on the Start menu and click on My Computer. Browse to the CD-ROM drive and open the "Longhorn4029Fix" folder, and copy winlogon.exe to the desktop.
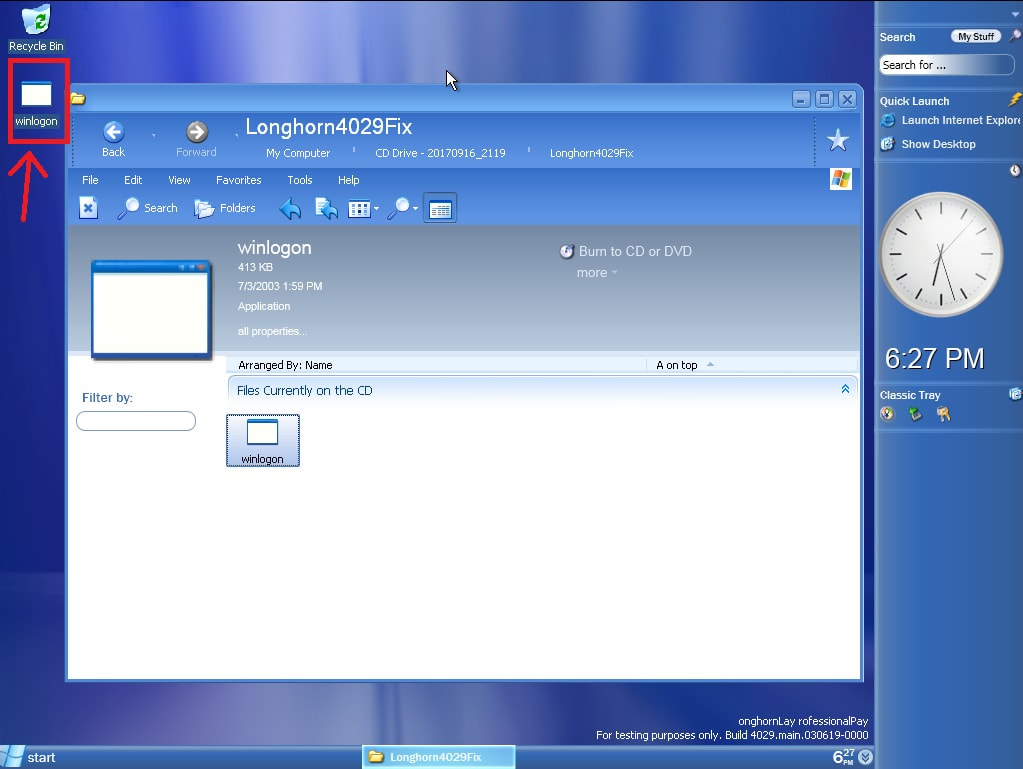
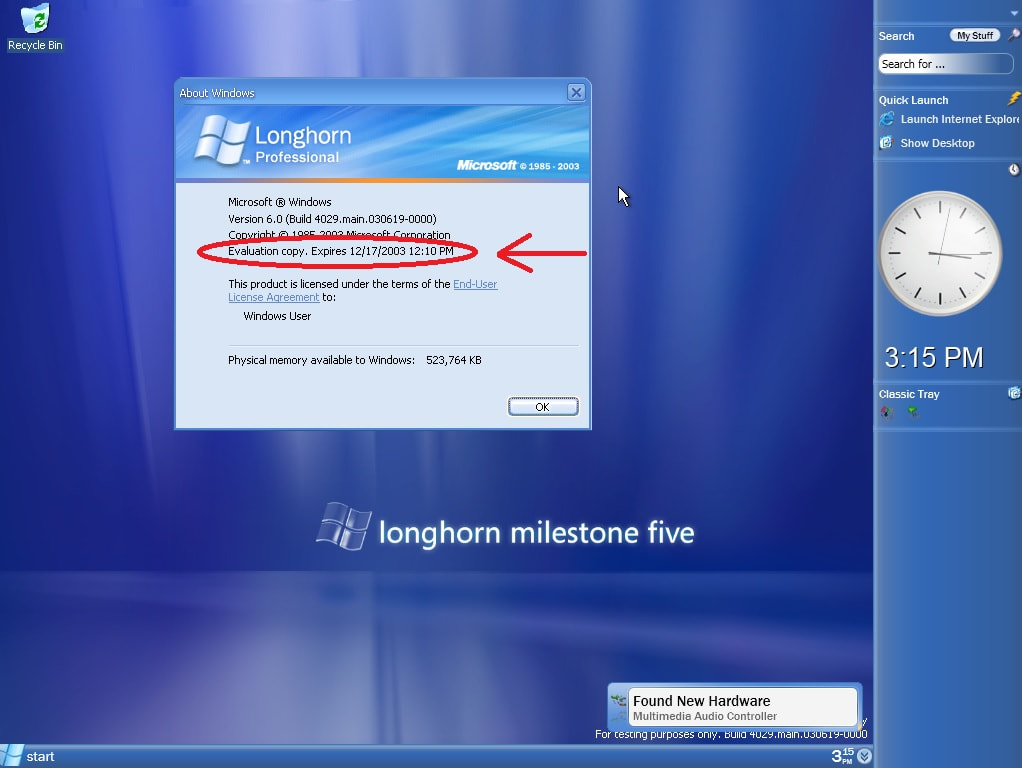
It should look something like this. And yes, the evaluation text is in Pig Latin.
5. Now, you can turn off the VM and change the ISO to the Zorin OS Live CD. Restart the virtual machine and boot into Zorin. (You may have to enter the BIOS and change the boot order to do this. Make sure the CD-ROM drive is above the Hard Drive.)
6. Once in Zorin, double click on the Computer icon, which should open the file explorer. Click on "Hard Disk (Windows)" and browse to Documents and Settings\Administrator\Desktop. You should see the winlogon.exe file.
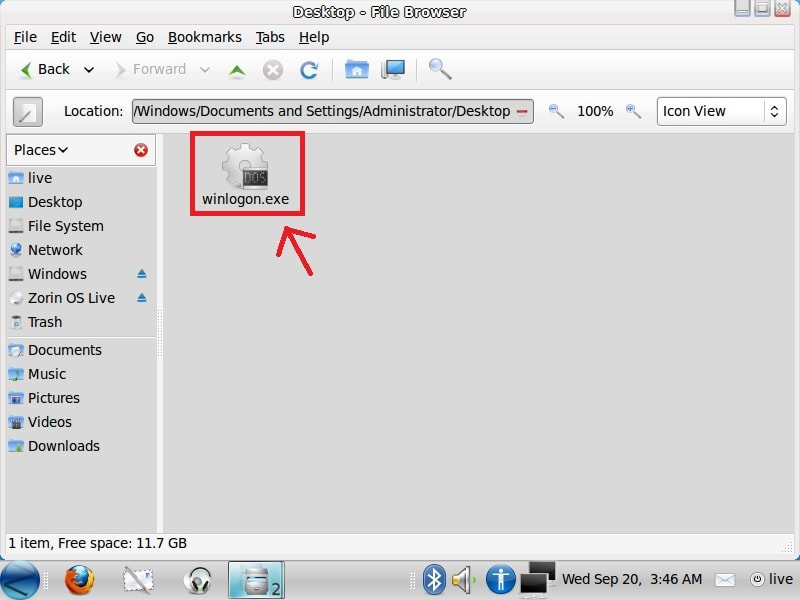
As you can see, the winlogon.exe file is visible.
7. Now, Right click on the winlogon.exe file and click Cut. Open a second explorer window and browse to Windows\system32.
Right click in any empty area and click Paste.
8. You should see a little confirmation box asking if you want to overwrite the current winlogon.exe file. Click on "Yes." To verify that the file was successfully replaced, you can check to see if the winlogon.exe file is still visible in the Desktop folder. If the file is no longer visible in the Desktop folder, then you're good to go.
9. Now, you can shut down Zorin OS. Change the mounted ISO back to the TweakNT CD, and restart Longhorn.
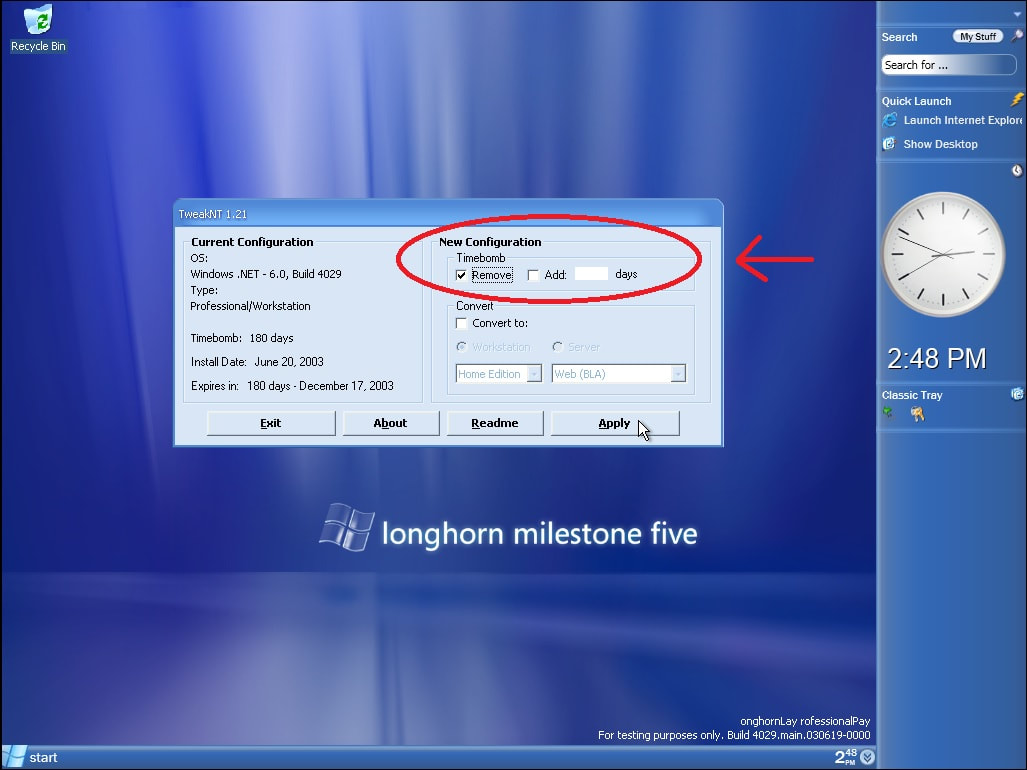
10. Don't worry, we're almost done. Once booted into Longhorn, you can go back to My Computer and browse to the CD-ROM drive. Open the TweakNT.exe file.
11. Once TweakNT is open, check "Remove Timebomb" and then click Apply.
7. Now, Right click on the winlogon.exe file and click Cut. Open a second explorer window and browse to Windows\system32.
Right click in any empty area and click Paste.
8. You should see a little confirmation box asking if you want to overwrite the current winlogon.exe file. Click on "Yes." To verify that the file was successfully replaced, you can check to see if the winlogon.exe file is still visible in the Desktop folder. If the file is no longer visible in the Desktop folder, then you're good to go.
9. Now, you can shut down Zorin OS. Change the mounted ISO back to the TweakNT CD, and restart Longhorn.
10. Don't worry, we're almost done. Once booted into Longhorn, you can go back to My Computer and browse to the CD-ROM drive. Open the TweakNT.exe file.
11. Once TweakNT is open, check "Remove Timebomb" and then click Apply.
It should look something like this.
12. Finally, just confirm that you want to apply the changes, and TweakNT will prompt you to restart Windows. After that, you're done!
12. Finally, just confirm that you want to apply the changes, and TweakNT will prompt you to restart Windows. After that, you're done!
Before.
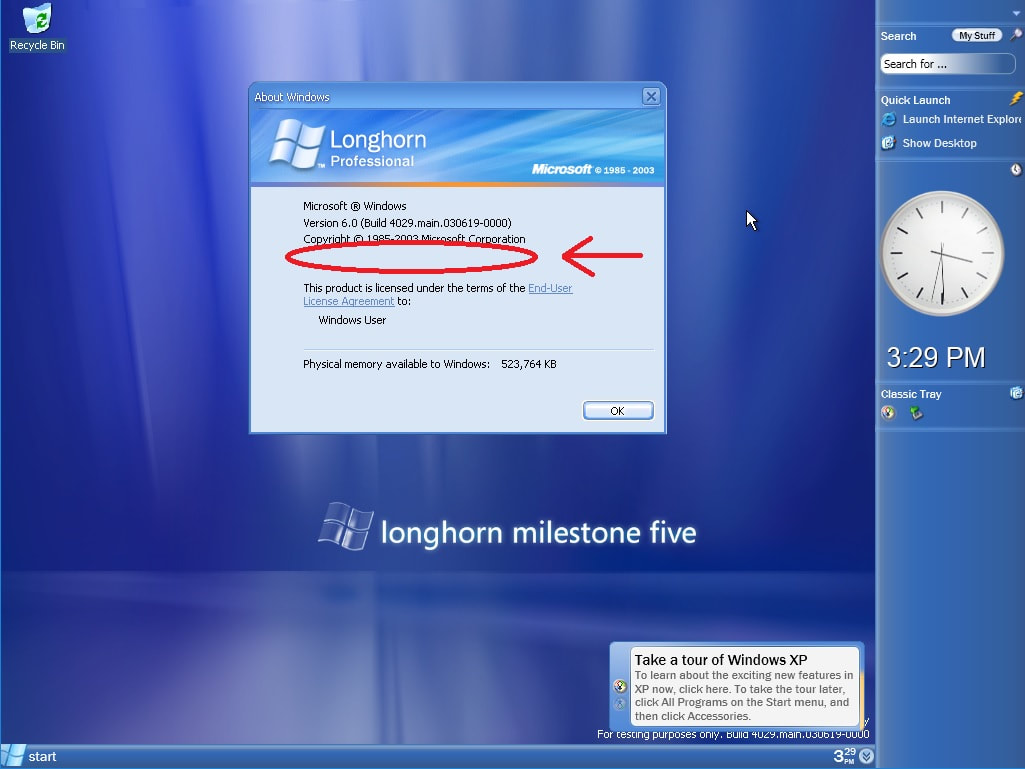
After. As you can see, the evaluation text is gone.
If you did everything right, you should now be able to change the BIOS date back to today's date (which could be 10 years into the future for all I know) and have Longhorn still boot. Please note that this procedure is completely optional; while it's not required, it's necessary if you want to browse the internet or download anything off it. And yes, this procedure can be used on real hardware as long as you burn the ISO files to real CD's.
Good luck!
*More topics will be added as time goes on, so check back soon!*
